![[map]](/images/PocketClock.png) POMDP, an online demo: user interface guide
POMDP, an online demo: user interface guide
My POMDP pages:
- Main page
- Detailled description
- User Interface guide (this page)
User Interface guide
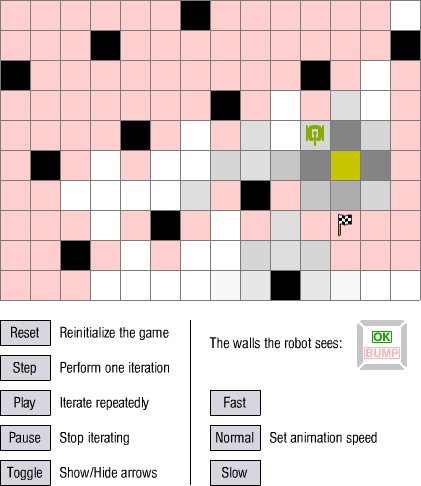
This is a screenshot of the simulation in action. The various components of the interface are described in the table below.
| Element | Description |
|---|---|
 |
Reinitialize the game. The robot is moved back to the start case. Let the game begin ! |
 |
Perform one iteration, which consists in:
|
 |
Perform repeatedly the iteration described above. Loop until the user interrupts it or until the robot reaches the checker. |
 |
Interrupts the loop started with the Play button. |
 |
Show or hide some arrows that help visualizing what action the robot is going to take depending of where it thinks to be. |
 |
Adjust animation speed when showing the outcome of the robot 's action. The animation speed also depends on the speed of your computer. |
 |
The robot. Sorry, it 's actually a tank. If you can think of a more peaceful graphism, please let me know. |
 |
The checker. The robots aims at reaching it. |
 |
An empty case in the labyrinth. Because it is red, we can say that the robot thinks it has no chance of being at this place. |
 |
A wall. The robot just can't go there. |
 |
A few cases. The various gray levels mean various probabilities to be there: the darker, the more likely the robot thinks it is there. |
 |
The case where the robot thinks it is. Among all the cases where the robot thinks it can be, this one is the most likely. The lighter the yellow, the stronger the belief to be here. When the robot is not on the yellow case, it is "lost". This case determines what action the robot is going to take on the next iteration (see the Toggle button). |
 |
The wall-sensors. Each sensor is black when a wall is detected and light gray (as in this example) otherwise. In the middle, two indicators shows whether the robot ran into a wall. This indication is given to the user, but the robot doesn't know whether it bumped a wall or not. |
Back to top.